Popular Now


Free Fire is known for its fast-paced action and tactical gameplay, but among all its unique mechanics, none are as critical to survival as the Gloo Wall. More than just a defensive tool, the Gloo Wall separates casual players from elite survivors. It is a mobile cover, a surprise tactic, and a psychological weapon all in one. Learning to master Gloo Wall usage can dramatically improve your survivability, strategic advantage, and clutch potential.
In this article, we’ll dive deep into the art and science of using Gloo Walls effectively — from beginner fundamentals to advanced mind games. Whether you’re playing solo, duo, or squad, understanding Gloo Wall mechanics can transform your playstyle and elevate your performance in every match.
1. What is the Gloo Wall and Why It Matters
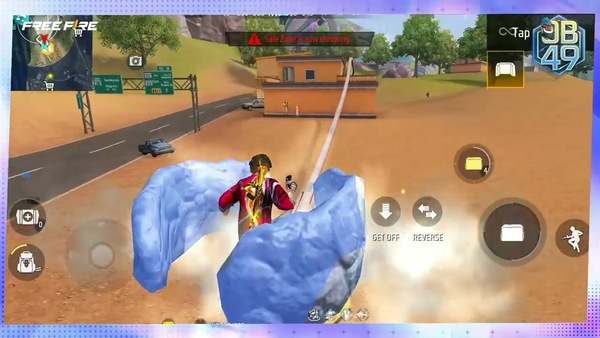
The Gloo Wall is a throwable utility in Free Fire that creates an instant concrete wall wherever it lands. It can be used to provide cover, block vision, trap enemies, or buy time for healing.
Basic Characteristics
-
The Gloo Wall deploys within 0.5 seconds after being thrown.
-
It can block bullets and grenades, making it an excellent defensive asset.
-
Each wall has health and can be destroyed with sustained fire.
Game-Changer in Combat
Unlike typical shooters, Free Fire doesn't rely heavily on natural cover. Gloo Walls offer artificial, on-demand protection. In open zones, they can mean the difference between winning and losing a firefight.
2. Acquiring Gloo Walls: Where and How
Before mastering usage, you must understand how to consistently collect Gloo Wall grenades during gameplay.
Looting Gloo Walls
-
Found in standard loot crates and airdrops.
-
Often located in high-tier loot zones such as Clock Tower, Peak, and Factory.
-
Available from vending machines using tokens.
Character Skills That Help
-
Nikita: Speeds up reloading, indirectly helping you build pressure while placing Gloo Walls.
-
A124 and Wukong: Offer aggressive skills that pair well with Gloo Wall tactics.
-
Xayne: Deals bonus damage to Gloo Walls and shields — ideal for counterplay.
3. Placement Fundamentals: Getting the Basics Right
Placing a Gloo Wall is easy, but placing it effectively takes practice and strategy.
Timing Your Deployment
Hesitation is fatal. You need to throw the Gloo Wall at the first sign of danger. Delay often results in death before the wall can save you.
Facing the Right Direction
Always face the enemy when placing the wall. The curved side of the wall should cover you. Beginners often misplace walls sideways, leaving gaps.
4. The Three Types of Gloo Wall Placement
There are generally three styles of placing Gloo Walls. Mastering when to use each can dramatically change outcomes.
Defensive Placement
Used for cover during open-area fights, healing, or reviving teammates. This is the most common and safest form of placement.
Aggressive Placement
Used to rush toward enemies by placing walls in a zigzag pattern. This minimizes exposure and helps close the gap.
Utility Placement
Used to block enemy movement, prevent revives, or trap players in buildings. Highly situational but very powerful when mastered.
5. Gloo Wall in Close-Range Battles
Close-range combat is where Gloo Walls shine the most. They can act as temporary shields during shotgun duels or 1v1 clutch fights.

Blocking an Enemy Rush
If you see an enemy sliding or rushing toward you, a quick Gloo Wall drop can interrupt their momentum.
Fast Healing Cover
Use the Gloo Wall to quickly patch up after an exchange. In Clash Squad mode, this tactic is vital for sustaining fights.
6. Gloo Wall Movement Tactics: Push Like a Pro
Movement and Gloo Wall usage go hand-in-hand. Many pros use them in sync to reduce damage while staying aggressive.
The Snake Pattern
By placing walls diagonally in front of you, you can move closer to the enemy while remaining protected from side angles.
Jump and Place
Jumping while placing the wall helps to place it directly beneath or beside you, useful when escaping from grenade damage or surprise shots.
7. Advanced Gloo Wall Techniques for Pros
Beyond basics, elite players develop unique mechanics to outplay enemies with creative Gloo Wall usage.
360° Shield
Placing multiple Gloo Walls around you creates a fortress for temporary safety. Useful when trapped in squad fights.
Multi-Layered Defense
Stacking Gloo Walls behind damaged ones gives you more time to heal or revive while the enemy breaks the first layer.
Gloo Wall Peeking
Stand close to the edge of the wall and peek-shoot. This minimizes your exposure while dealing damage.
8. Using Gloo Walls in Ranked Mode
Ranked games are about strategy, not just aim. Gloo Walls are critical tools for positioning and rotating safely.
Rotation and Positioning
Use walls to rotate from low ground to high ground or when crossing dangerous open areas. Strategic use keeps you from being sniped or ambushed.
End-Game Circles
In the final shrinking circles, Gloo Walls become the only cover available. Save at least 2–3 for this stage to gain a major advantage.
9. Countering Enemy Gloo Walls
Every great tool has a counter. Knowing how to deal with enemies hiding behind or abusing Gloo Walls is crucial.
Explosives
Use grenades or launchers to destroy or bypass walls quickly. This forces enemies out of hiding.
Bait and Flank
When an enemy uses a wall, throw a flashbang to the side, then flank them while they are disoriented.
Wall Penetrating Characters
Some characters have skills that ignore shields or boost wall damage, such as Xayne and Skyler. Use them wisely.
10. Training and Perfecting Gloo Wall Skills
Even with knowledge, only practice will make you proficient. Consistent training helps improve reflexes and build muscle memory.
Training Ground
Use the Training Grounds to practice placing walls under pressure. Time yourself and challenge your own reaction speed.
Custom Rooms
Play 1v1 matches or squad rooms focused solely on Gloo Wall combat. This lets you simulate real fights and adjust to timing.
Analyze Pros
Watch tournament streams or YouTube tutorials of professional Free Fire players. Observe how they use walls not just for defense, but to control fights.
Conclusion
Mastering Gloo Walls is no longer optional — it’s essential. In Free Fire, those who control the battlefield often do so with smart, efficient use of Gloo Walls. From protecting yourself in open terrain to pushing enemies aggressively, from solo ranked fights to squad support, the Gloo Wall is your lifeline. This in-depth understanding and training around its usage will not only enhance your win rate but also make you a more versatile, tactical player overall.
Keep practicing, keep adjusting, and you'll soon find yourself building walls like the pros — fast, accurate, and deadly effective.